Uploading an image using Django Rest Framework (DRF) refers to the process of sending an image file from a client to a server API built with Django and DRF. The image file is then processed and saved on the server.
How the upload image process works with django rest framework(DRF):
- The client (e.g., from a web or mobile application) sends a request to the server API to upload an image. This request is typically an HTTP POST request.
- The server API, built with Django and DRF, receives the image file from the client.
- The server API validates the image file to ensure it meets any specified requirements, such as file size, file type, or any custom validation rules.
- Once the image file is validated, the server API saves the image file to a designated location on the server. This location is typically specified in the Django project's settings.
- The server API may perform additional processing on the uploaded image, such as resizing, cropping, or generating thumbnails.
- The client receives the response from the server API and can handle it accordingly, such as by displaying a success message to the user or showing an error if the upload failed.
You have a few options for the format in which you can send the image data from the client to the server when uploading images with the Django Rest Framework (DRF). Using the multipart/form-data format or encoding the image data in Base64 are two typical methods.
Multipart/Form-Data:
- This is the standard way to upload files, including images, through HTML forms and APIs.
- In this approach, the image file is sent as part of a multipart/form-data POST request. The request payload contains separate parts for each field, including the image file field.
- The client sends the image file as binary data, preserving its format and structure.
- On the server side, Django Rest Framework automatically handles the multipart/form-data encoding and provides access to the uploaded file through the request .FILES dictionary.
- You can use the MultiPartParser parser class in DRF to handle this type of request. It is already included by default in the APIView class.
- You can use the function base view; there is no need to use any parser class (in this article, we used the function base view).
Base64 Encoding:
In the Django Rest Framework (DRF), a Base64 string refers to a string representation of binary data encoded using the Base64 encoding scheme. Base64 encoding is commonly used to represent binary data, such as images, in a text format that can be easily transmitted over various communication protocols, including HTTP.
When working with DRF, you may encounter Base64 strings in scenarios where you need to handle or transmit binary data, such as images, through API endpoints. For example, if you want to include an image as part of a JSON payload sent via a POST request, you can convert the image data into a Base64-encoded string and include it as a field in the JSON object.
Prerequisites:
- Basic Knowledge of Django and the Django Rest Framework
- Basic Knowledge of JavaScript
First, make sure you have created a Django project.
Django steps:
- Install the necessary libraries(
django,djangorestframework,Pillow) - Create an app named as you wish (in my case,
myapp) - Define apps in
settings.py - Add media and static files location in
settings.py - Register static and media urls in
urls.py - Create a model in
myapp/models.py - Create a serializer class in
myapp/api/serializers.py - Create a function base view in
myapp/api/views.py - Add the view in
urls.pyand create a new route
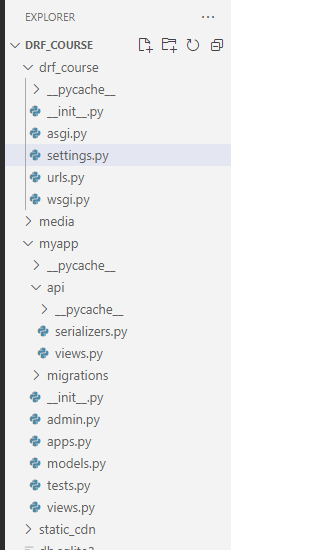
Project structure for uploading images using the Django Rest framework
Django Implementations:
1/9. Install the necessary libraries:
Django REST Framework (DRF) is a powerful and flexible toolkit for building Web APIs in Django. It provides a set of tools and utilities that simplify the process of building APIs and handling common tasks such as serialization, authentication, and permissions. DRF is widely used and is considered the de facto standard for building RESTful APIs with Django.
Pillow, on the other hand, is a popular Python imaging library that adds support for opening, manipulating, and saving many different image file formats. It provides a simple and intuitive API for performing operations like resizing, cropping, applying filters, and more. Pillow is a fork of the Python Imaging Library (PIL) and is compatible with Python 3.x.
pip install djangorestframework Pillow2/9. Create an app named as you wish (in my case, myapp):
Create an app for implementing functionalities of upload image. In my case, created an app named myapp.
django-admin startapp myapp3/9. Define apps in settings.py:
The purpose of registering or defining apps in the Django settings.py file is to inform Django about the apps that are part of your project. This allows Django to load and configure those apps correctly during the application startup process. rest_framework is an external app that comes from djangorestframework, and myapp was created by me.
# Application definition

INSTALLED_APPS = [
    "django.contrib.admin",
    "django.contrib.auth",
    "django.contrib.contenttypes",
    "django.contrib.sessions",
    "django.contrib.messages",
    "django.contrib.staticfiles",
    "rest_framework",
    "myapp",
]
4/9. Add media and static files location in settings.py:
MEDIA_URL and MEDIA_ROOT are used to serve media files and STATIC_URL and STATIC_ROOT are used to serve static files during development.
Make sure to create
mediaandstatic_cdnfolder in root directory.
STATIC_URL = "/static/"
MEDIA_URL = "/media/"
STATICFILES_DIRS = [os.path.join(BASE_DIR, "static_cdn")]
STATIC_ROOT = os.path.join(BASE_DIR, "static")
MEDIA_ROOT = os.path.join(BASE_DIR, "media")
5/9. Register static and media urls in urls.py:
You need to configure your urls.py to include the MEDIA_URL patterns and STATIC_URL patterns to serve the media and static files using the Django development server.
For development nginx or apache is use to server media and static files.
from django.contrib import admin
from django.urls import path, include
from django.contrib.auth import views as auth_views
from django.conf.urls.static import static
from django.conf import settings


urlpatterns = [
    path("admin/", admin.site.urls),
]

if settings.DEBUG:
    urlpatterns += static(settings.STATIC_URL, document_root=settings.STATIC_ROOT)
    urlpatterns += static(settings.MEDIA_URL, document_root=settings.MEDIA_ROOT)
6/9. Create a model in myapp/models.py:
I created a model named Article. image field is necessary to save an image on the server disk and store the path in the database.
file_locationis a function to dynamically create a path for saving images.
from django.db import models


def file_location(instance, filename, **kwargs):
    file_path = f"article/{instance.title}-{filename}"
    return file_path


class Article(models.Model):
    title = models.CharField(max_length=255, null=False, blank=False)
    content = models.TextField(max_length=5000, null=False, blank=False)
    image = models.ImageField(upload_to=file_location, null=False, blank=True)
    created_at = models.DateTimeField(auto_now_add=True, verbose_name="created_at")
    updated_at = models.DateTimeField(auto_now=True, verbose_name="updated_at")

    def __str__(self):
        return self.title
7/9. Create a serializer class in myapp/api/serializers.py:
In Django, a serializer is a component of Django's serialization framework that allows you to convert complex data types, such as Django model instances, into Python native data types that can be easily rendered into various formats, including JSON, XML, or even HTML.
I used ModelSerializer. By using ModelSerializer, you can automatically convert a Python or JSON variable to a model object and the model to JSON serialized data, which includes default fields, validators, and behaviors based on the corresponding model. It reduces the amount of boilerplate code required to.
from rest_framework import serializers
from myapp.models import Article


class ArticleSerializer(serializers.ModelSerializer):
    class Meta:
        model = Article
        fields = ["title", "content", "image"]
8/9. Create a function base view in myapp/api/views.py:
Create a function-based view named upload_article_view. That receives client requests and validates sending data by ArticleSerializer, and if the data is valid, then saves it in the database and also saves an image on disk.
from rest_framework.response import Response
from rest_framework.decorators import api_view
from myapp.api.serializers import ArticleSerializer


@api_view(["POST"])
def upload_article_view(request):
    if request.method == "POST":
        data = request.data
        serializer = ArticleSerializer(data=data)

        if serializer.is_valid():
            article = serializer.save()
            data = serializer.data
            return Response(data=data)
        return Response(serializer.errors, status=400)
9/9. Add the view in urls.py and create a new route:
Add upload_article_view in urls.py with a valid url pattern.
from myapp.api.views import upload_article_view
urlpatterns = [
path("admin/", admin.site.urls),
path("api/upload_article", upload_article_view, name="upload_article"),
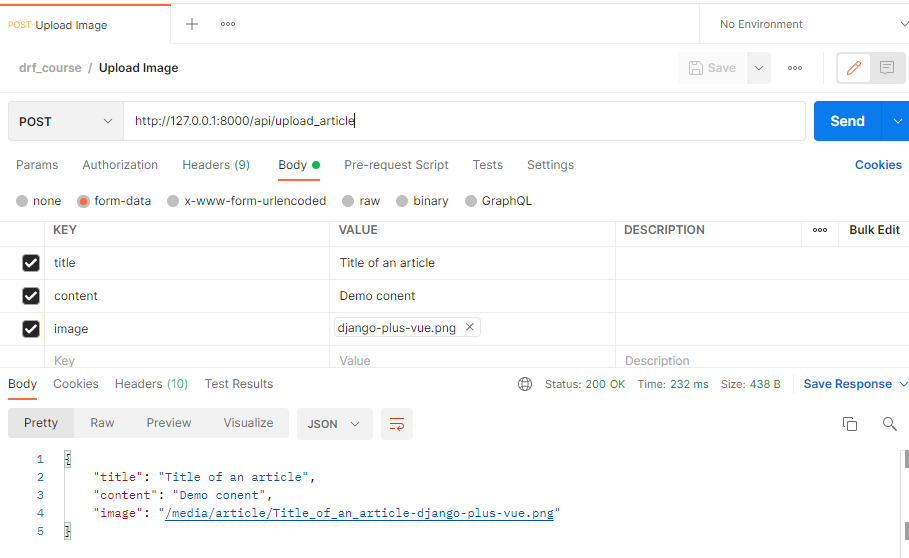
]python manage.py makemigrationspython manage.py migratepython manage.py runserverUsing Postman or any other http client, we can test the API:
Url: http://127.0.0.1:8000/api/upload_article
JavaScript Steps:
- Register the templates directory in
settings.py - Create a templates/html file
- Create a form for uploading image
- Create an
axiosrequest for uploading images - Create a view in
myapp/views.py - Add the view in
urls.pyand create a new route
JavaScript Implementations on the Django Template:
1/6. Register the templates directory in settings.py:
In Django, the template directory is a location where you store your HTML templates that define the structure and layout of your web pages. Django uses a templating system to separate the design and presentation logic from the Python code, allowing you to create dynamic and reusable web pages.
Create a folder in root directory.
TEMPLATES = [
    {
        "BACKEND": "django.template.backends.django.DjangoTemplates",
        "DIRS": [os.path.join(BASE_DIR, "templates")],
        "APP_DIRS": True,
        "OPTIONS": {
            "context_processors": [
                "django.template.context_processors.debug",
                "django.template.context_processors.request",
                "django.contrib.auth.context_processors.auth",
                "django.contrib.messages.context_processors.messages",
            ],
        },
    },
]
2/6. Create a templates file templates/upload_image.html:
Using the bootstrap stater template, create an html file and also add some CSS to improve the design.
<!doctype html>
<html lang="en">

<head>
    <!-- Required meta tags -->
    <meta charset="utf-8">
    <meta name="viewport" content="width=device-width, initial-scale=1, shrink-to-fit=no">

    <!-- Bootstrap CSS -->
    <link rel="stylesheet" href="https://cdn.jsdelivr.net/npm/bootstrap@4.4.1/dist/css/bootstrap.min.css"
        integrity="sha384-Vkoo8x4CGsO3+Hhxv8T/Q5PaXtkKtu6ug5TOeNV6gBiFeWPGFN9MuhOf23Q9Ifjh" crossorigin="anonymous">

    <title>Upload Image</title>
    <style>
        body {
            padding: 1rem;
        }
    </style>
</head>

<body>


    <!-- Optional JavaScript -->
    <!-- jQuery first, then Popper.js, then Bootstrap JS -->
    <script src="https://code.jquery.com/jquery-3.4.1.slim.min.js"
        integrity="sha384-J6qa4849blE2+poT4WnyKhv5vZF5SrPo0iEjwBvKU7imGFAV0wwj1yYfoRSJoZ+n" crossorigin="anonymous">
    </script>
    <script src="https://cdn.jsdelivr.net/npm/popper.js@1.16.0/dist/umd/popper.min.js"
        integrity="sha384-Q6E9RHvbIyZFJoft+2mJbHaEWldlvI9IOYy5n3zV9zzTtmI3UksdQRVvoxMfooAo" crossorigin="anonymous">
    </script>
    <script src="https://cdn.jsdelivr.net/npm/bootstrap@4.4.1/dist/js/bootstrap.min.js"
        integrity="sha384-wfSDF2E50Y2D1uUdj0O3uMBJnjuUD4Ih7YwaYd1iqfktj0Uod8GCExl3Og8ifwB6" crossorigin="anonymous">
    </script>

</body>

</html>
3/6. Create a form for uploading image:
Create a form with three input files: title, content, and image. The image field type is file, and it's accept="image/*" just for selecting an image file.
<form method="POST"">
        <label for="title">Title</label>
        <br>
        <input type="text" name="title" id="title" placeholder="title">
        <br>
        <br>
        <label for="content">Content</label>
        <br>
        <textarea name="content" id="content" placeholder="Content"></textarea>
        <br>
        <br>
        <label for="image">Image</label>
        <input type="file" name="image" id="image" accept="image/*">
        <br>
        <button type="submit">Submit</button>
</form>
4/6. Create an axios request for uploading images:
Axios is a popular JavaScript library used for making HTTP requests from web browsers and Node.js. It provides a simple and convenient API for performing asynchronous HTTP requests, handling response data, and managing request interceptors and response interceptors.
Add Axios CDN to the body tag:
<!-- Axios -->
<script src="https://cdnjs.cloudflare.com/ajax/libs/axios/1.4.0/axios.min.js"
integrity="sha512-uMtXmF28A2Ab/JJO2t/vYhlaa/3ahUOgj1Zf27M5rOo8/+fcTUVH0/E0ll68njmjrLqOBjXM3V9NiPFL5ywWPQ=="
crossorigin="anonymous" referrerpolicy="no-referrer"></script>
Create and function for POST request:
<script>
        function upload_data(event) {
            event.preventDefault();
            var title = document.getElementById("title").value
            var content = document.getElementById("content").value
            var image = document.getElementById("image").files[0]
            var form_data = new FormData()
            form_data.append("title", title)
            form_data.append("content", content)
            form_data.append("image", image)
            axios.post(
                    '/api/upload_article',
                    form_data, {
                        headers: {
                            'Content-Type': 'multipart/form-data'
                        },
                        xsrfCookieName: 'csrftoken',
                        xsrfHeaderName: 'X-CSRFTOKEN'
                    })
                .then(function (response) {
                    console.log(response);
                })
                .catch(function (error) {
                    console.log(error);
                });
        }
</script>
5/6. Create a view in myapp/views.py:
Create a django view to rendering template.
from django.shortcuts import render


def upload_image_view(request):
    return render(request, "upload_image.html", {})
6/6. Add the view in urls.py and create a new route:
Add upload_image_view in urls.py with a valid url pattern.
from myapp.views import upload_image_view
urlpatterns = [
path("admin/", admin.site.urls),
path("api/upload_article", upload_article_api_view, name="api_upload_article"),
path("upload_image", upload_image_view, name="upload_image"),
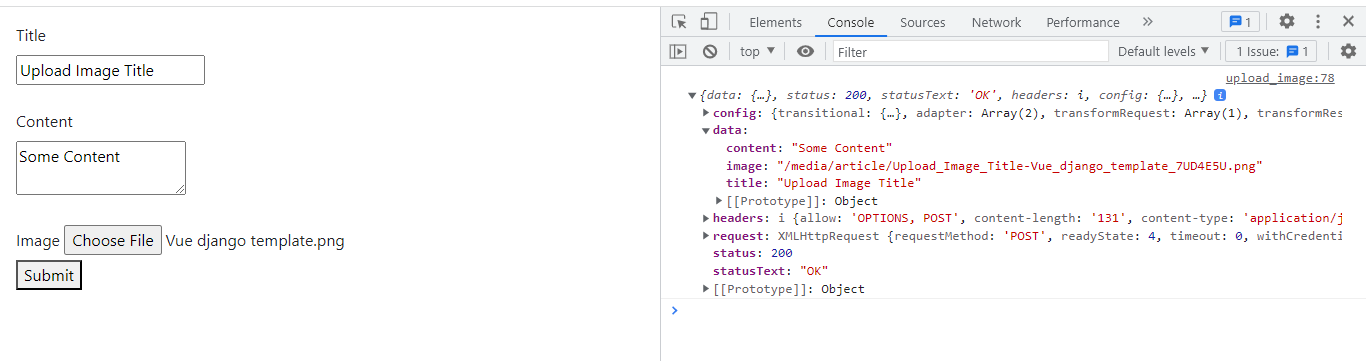
]Using Chrome or browser:
Url: http://127.0.0.1:8000/upload_image
Full Frontend Code of uploading image:
<!doctype html>
<html lang="en">

<head>
    <!-- Required meta tags -->
    <meta charset="utf-8">
    <meta name="viewport" content="width=device-width, initial-scale=1, shrink-to-fit=no">

    <!-- Bootstrap CSS -->
    <link rel="stylesheet" href="https://cdn.jsdelivr.net/npm/bootstrap@4.4.1/dist/css/bootstrap.min.css"
        integrity="sha384-Vkoo8x4CGsO3+Hhxv8T/Q5PaXtkKtu6ug5TOeNV6gBiFeWPGFN9MuhOf23Q9Ifjh" crossorigin="anonymous">

    <title>Upload Image</title>
    <style>
        body {
            padding: 1rem;
        }
    </style>
</head>

<body>
    <form method="POST" onsubmit="upload_data(event)">
        <label for="title">Title</label>
        <br>
        <input type="text" name="title" id="title" placeholder="title">
        <br>
        <br>
        <label for="content">Content</label>
        <br>
        <textarea name="content" id="content" placeholder="Content"></textarea>
        <br>
        <br>
        <label for="image">Image</label>
        <input type="file" name="image" id="image" accept="image/*">
        <br>
        <button type="submit">Submit</button>
    </form>

    <!-- Axios -->
    <script src="https://cdnjs.cloudflare.com/ajax/libs/axios/1.4.0/axios.min.js"
        integrity="sha512-uMtXmF28A2Ab/JJO2t/vYhlaa/3ahUOgj1Zf27M5rOo8/+fcTUVH0/E0ll68njmjrLqOBjXM3V9NiPFL5ywWPQ=="
        crossorigin="anonymous" referrerpolicy="no-referrer"></script>


    <!-- Optional JavaScript -->
    <!-- jQuery first, then Popper.js, then Bootstrap JS -->
    <script src="https://code.jquery.com/jquery-3.4.1.slim.min.js"
        integrity="sha384-J6qa4849blE2+poT4WnyKhv5vZF5SrPo0iEjwBvKU7imGFAV0wwj1yYfoRSJoZ+n" crossorigin="anonymous">
    </script>
    <script src="https://cdn.jsdelivr.net/npm/popper.js@1.16.0/dist/umd/popper.min.js"
        integrity="sha384-Q6E9RHvbIyZFJoft+2mJbHaEWldlvI9IOYy5n3zV9zzTtmI3UksdQRVvoxMfooAo" crossorigin="anonymous">
    </script>
    <script src="https://cdn.jsdelivr.net/npm/bootstrap@4.4.1/dist/js/bootstrap.min.js"
        integrity="sha384-wfSDF2E50Y2D1uUdj0O3uMBJnjuUD4Ih7YwaYd1iqfktj0Uod8GCExl3Og8ifwB6" crossorigin="anonymous">
    </script>
    <script>
        function upload_data(event) {
            event.preventDefault();
            var title = document.getElementById("title").value
            var content = document.getElementById("content").value
            var image = document.getElementById("image").files[0]
            var form_data = new FormData()
            form_data.append("title", title)
            form_data.append("content", content)
            form_data.append("image", image)
            axios.post(
                    '/api/upload_article',
                    form_data, {
                        headers: {
                            'Content-Type': 'multipart/form-data'
                        },
                        xsrfCookieName: 'csrftoken',
                        xsrfHeaderName: 'X-CSRFTOKEN'
                    })
                .then(function (response) {
                    console.log(response);
                })
                .catch(function (error) {
                    console.log(error);
                });
        }
    </script>
</body>

</html>
Github Link:
https://github.com/mdmarjanhossain0/drf_course