Django Celery is an excellent choice for handling long-running tasks in your Django application. Long-running tasks are operations that may take a significant amount of time to complete and can potentially block the responsiveness of your web application if executed synchronously. By using Celery to offload these tasks to background workers, you can ensure that your web application remains responsive and efficient for handling user requests.
Some common use cases for using Django Celery to handle long-running tasks are:
- Sending Emails: Sending emails can be a time-consuming task, especially when dealing with large email lists or complex email templates. By using Celery, you can queue the email-sending task to background workers, allowing your web application to quickly respond to user requests without waiting for the emails to be sent.
- Image or File Processing: Operations like image resizing, thumbnail generation, or file format conversions can be resource-intensive and slow down your application's response time. Celery can handle these tasks in the background, freeing up your web application to serve user requests efficiently.
- Data Import/Export: When dealing with large datasets, importing or exporting data to or from your database can be time-consuming. Celery can be used to perform these data operations asynchronously, preventing your application from being tied up during the data transfer.
- Generating Reports: Generating complex reports that involve data aggregation and analysis might take a considerable amount of time. By offloading report generation to Celery tasks, you ensure that your web application remains available to users while the reports are being processed.
- Web Scraping: Scraping data from external websites can be a time-consuming operation. Celery allows you to perform web scraping tasks in the background, decoupling them from your web application's response time.
- PDF Generation: Generating PDF documents, especially those with large or complex content, can take a while. By using Celery, you can create PDFs asynchronously and provide a better user experience.
Machine Learning and Data Analysis: Training machine learning models or performing complex data analysis can be resource-intensive. Celery allows you to delegate these tasks to dedicated workers, ensuring that your web application remains available for other users. These are just a few examples of long-running tasks that Django Celery can handle effectively. The main advantage is that you can keep your web application responsive and user-friendly while performing resource-intensive operations in the background. Celery's distributed task queue system ensures that tasks are efficiently distributed among workers, making it a reliable choice for handling asynchronous operations in Django.
Concept of celery:
Celery is not a Django server itself, nor is it an external server that directly accesses the Django server. Instead, Celery works as a separate distributed task queue system that operates alongside your Django application.
How the interaction between Django and Celery works:
- Django Application: Your Django application serves as the web server that handles user requests, processes views, and communicates with the client-side. It is responsible for managing user interactions, rendering templates, and providing the primary functionality of your web application.
- Celery Workers: Celery workers are separate processes that are responsible for executing background tasks. They can run on the same server as your Django application or on different servers, depending on your deployment setup. These workers do not directly interact with the Django application or its database.
- Message Broker: The message broker acts as an intermediary between your Django application and the Celery workers. It holds the tasks in a queue and dispatches them to available workers for processing. The message broker ensures reliable communication between your Django application and the Celery workers. Examples of message brokers include RabbitMQ, Redis, and Amazon SQS.
The steps for implementing Celery in your Django application are:
- Install Celery: First, you need to install Celery and any required dependencies. You can do this using Python's package manager, pip.
- Configure Celery in Django: In your Django settings.py file, define the Celery settings, including the message broker URL and any other configuration options specific to your setup.
- Define Celery Tasks: Create Python functions that represent the tasks you want to run asynchronously. Decorate these functions with the @task decorator provided by Celery. These functions will be the tasks that Celery workers will execute.
- Enqueue Celery Tasks: In your Django views, models, or any part of your application where you need to execute a long-running task asynchronously, call the Celery task functions you defined in the previous step. Instead of executing the task immediately, Celery will enqueue it in the message broker for processing by the workers.
- Start Celery Workers: Launch the Celery worker processes. This is typically done using the celery worker command, which will start one or more worker processes depending on your configuration.
- Monitor Celery: Optionally, you can use tools like Flower (Celery monitoring tool) to monitor the status and progress of your Celery tasks.
Requirements:
- Django application 3.2+
- Radis
- Celery 5+
Key Assumptions
- Python 3.8+ installed in your pc
- Python experience
- Django experience
Implementations:
Create a Django project in the traditional way, then follow this article step by step.
Radis Install
For the Windows operating system, it is officially not available. Medurai, or Docker radis, is used for installing radis. For GitHub, open-source contributors are developing a radis for Windows. In this session, I'll use that. Github download link: download and install it on your system.
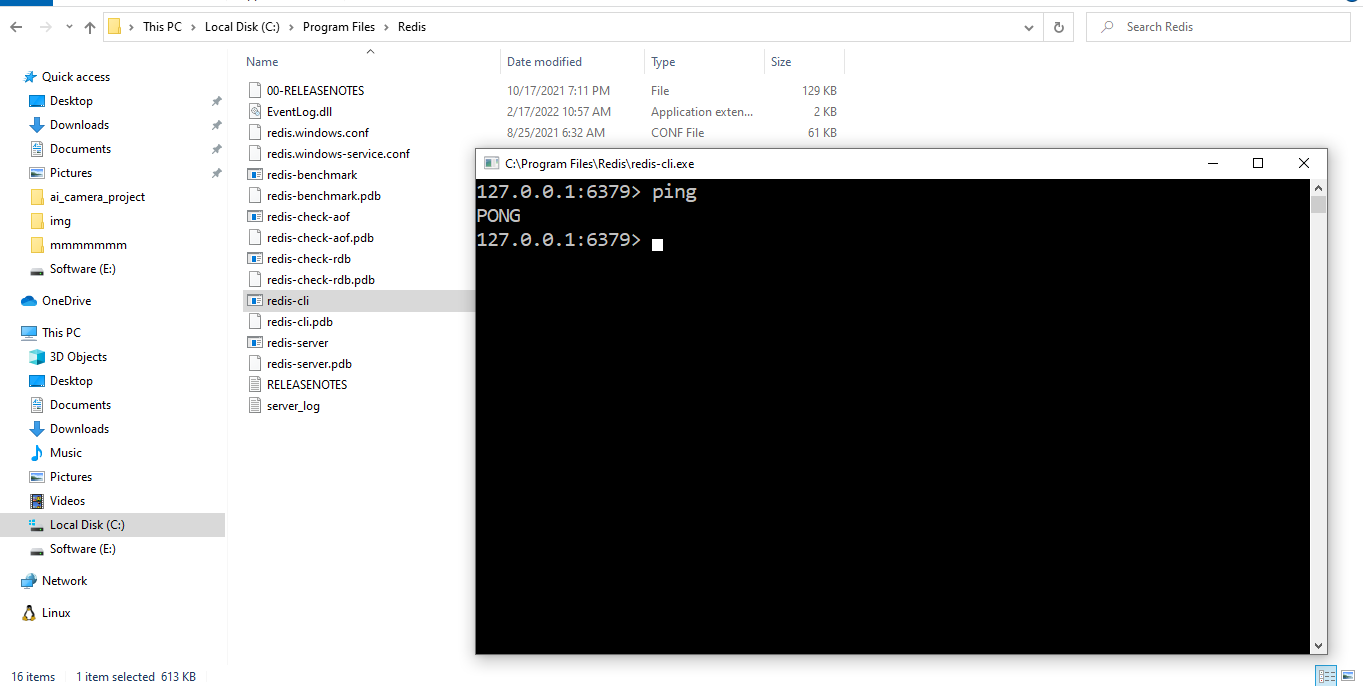
Then Goto C drive > program files > radis
Click radis-cli and write the command ping. If it responds with PONG, your Radis server has been successfully configured.
For the Linux operating system, Install Radis by command
sudo apt install redis-serverInstall required libraries:
pip install celery,redis,django-celery-resultsconfigure settings.py:
First, register your app in INSTALLED_APPS and add the setting below.
CELERY_BROKER_URL = "redis://localhost:6379"
CELERY_RESULT_BACKEND = "django-db"
CELERY_ACCEPT_CONTENT = ["application/json"]
CELERY_RESULT_SERIALIZER = "json"
CELERY_TASK_SERIALIZER = "json"
CELERY_TIMEZON = "Asia/Dhaka"
Adding Celery configuration to Django application:
Create celery.py in the Django settings folder and Add the code snippet below.
from __future__ import absolute_import, unicode_literals
import os
from celery import Celery
from django.conf import settings

os.environ.setdefault("DJANGO_SETTINGS_MODULE", "< project name >.settings")


app = Celery("< project name >")
app.conf.enable_utc = False
app.conf.update(timezone="Asia/Dhaka")

app.config_from_object(settings, namespace="CELERY")

app.autodiscover_tasks()


@app.task(bind=True)
def debug_task(self):
    print(f"Request: {self.request}")
Register the Celery configuration file with the Django application:
from .celery import app as celery_app

__all__ = ("celery_app",)
Write a task handler function:
Create a Python file named tasks.py in any Django app. In that file, we will write task handlers or worker functions.
from celery import shared_task


@shared_task(bind=True)
def test_func(self, data):
    print(data)
    for i in range(1, 10):
        print(i)
    return "Done"
Assign task in celery:
For assigning task, we make a django view. When django view is called automatically task will assign in celery task queue. If you call multiple task celery will handle it one by one FIFO manner.
from django.shortcuts import render

import .tasks import test_func

def test_view(request):
	data = {
	"key": "value"
	}
	test_func.delay(data=data)
	return render(request, "home.html", context={})